Kitchen Drawer De-clutter!!

Okay SO you ever just get sick and tired of a cluttered kitchen drawer? I MOST DEFINITELY DID. You know the one, where you try to open it there's some spatula or wooden spoon that mysteriously lodged itself in between the end of the drawer and the front of the counter. You know what I mean....where the drawer opens MAYBE and inch or two? Just BARELY enough to get your fingers in to nudge the object out of the way so you can open the drawer again.

Well thats where I was with this one. I don't have a very big kitchen so storage is a real challenge. And more often than not, I run out of space for things. So I decided to clean it up a bit and finally pop in those liners to keep from everything sliding around when I fling the bad boy open.  These little cushiony things are great...the best part is that they come in rolls and you can customize them to fit any space needed! :) So maybe I may just make some CUTESY coasters, now that I think about it!


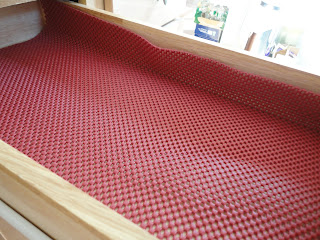
So I rolled it out in the drawer to get a good length.


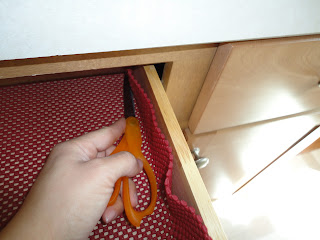
I used scissors to get a good crease in the edges so that it made it easier to cut the right width.


Then I found my imaginary line and cut straight along the squares.


I added my baking,and cooking utensils nice and neat and now with the liner they STAY PUT!
AHHH a great feeling indeed....to see it look exactly the same when I open the drawer as I left it when I closed it!


Now on to the next one.....the eternally cluttered junk drawer!
just a bit of a clean up...i guess I'll have to do more thinking on this one.


For those little things like the rings that come with measuring cups or spoons that just get in the way....
So I didn't need this ring for my measuring cups but I kept it  for another  purpose...

potholders! After all what good are they if they are at the bottom of a drawer?

I just hooked them onto the ring..

and PRESTO!!! lol easy access!!

Yes I know I don't have a color scheme in my kitchen....I kinda need some assistance there! lol


What do you think? Any suggestions/ideas? Care to share your own posts on the same? 

Getting healthy for a GREAT cause

Good Morning Everyone!

So with being a mommy, not being in the Active Army and also not having much leeway to go out for runs on my own, I have decided to force myself into shape FOR A GOOD CAUSE!!

This year's resolution is to get healthy while helping others get healthy. I have decided to attempt every run/walk I come across. It's a great opportunity to get in shape by running and /or walking, while fundraising to give back to those who need it most, for example the runs/walks I am going to participate in will benefit the Special Olympics, Breast Cancer research and Lymphoma. I also intend to do one or two in support of Autism.


My first one is in April, it's called the Lincoln Tunnel challenge where the 5k is ran straight through one of the tubes that cross the Hudson River from New Jersey into New York. Isn't that so cool? How many of us will be able to say "I ran the Lincoln Tunnel"  I really can't wait and I have begun to focus on my running in order to bring my current run time down. The lower it gets can only mean the healthier I get, and the runs I do mean money is being given to organizations that benefit others :)

So from now until the event, you will see my newly added gadget on the right, that measures the donations received for this run.  Donations would be greatly GREATLY APPRECIATED....and its true what they say....

Every little bit counts....

I will also provide the actual website to process those donations, just comment me for directions and I will be happy to give you all of my info for the site. I also intend to document this run and hope to share it with you all!!!!


Click HERE to check out the race, join the race, or donate to a runner/walker. :) Comment if you need my full name to sponsor me :)

Thanks so much guys I hope you all have a great week, and cheers to good health!!!


It's Spring Because My Nails Say So!!

Heylo Everyone!!
Well today has felt like a pretty productive day for me. I actually cleaned out and reorganized some drawers in my kitchen, cleaned off the counter did my usually rounds with the lil' one and studied for my History Mid-Term. I even threw some laundry in the mix, because c'mon....who doesn't love doing that? wink wink

So I had my first Mid-Term of the semester, a test of whether I can keep information in this old dome of mine. Hopefully I didn't do half bad! I winded my day down with the little one at her grandma's house, then went home and put her to bed. The days I have class are the days she gets to enjoy family and play with her cousin if she happens to be there. Which is great. She needs the social interaction.
Look at these two lil' cuties....
So I'm home and I'm so disappointed in the polish of my last manicure. It was an Essie color that did not belong to me and after just TWO days it was pretty much chipped away. I usually hear so many good things about that brand of nail polish, but I haven't had many good experiences. They seem to chip pretty quickly and it seems that it takes three or more coats just to get the color you see in the bottle.

Well I was sick of looking at my crusty little sausage fingers in that way, so I decided to have a do-over. Just last week we had a nice little spurt of great weather, and it seemed that spring was here. But alas! A snow storm just days after that! WOMP WOMP

So I spruced up my home and the weather spruced up my spirits so why not my nails?! :) I dug into my little collection and picked up Pop of Poppy by Nicole by O-P-I. I have several Nicole polishes and they have never failed me! So when a new color comes out and catches my eye, it's mine! Looking at them type away make me happy...even if there is a bunch of gloomy slush on the ground and a never ending pile of laundry upstairs ;)

Enjoy!


As always, start with clean nails and remove any old polish. File if needed and clean it up around the edges :)


This is the polish I used for the base coat and top coat. I like it, it's a bit strong but no way stronger than nailtique which is great but I can only tolerate that smell for so long! (I think I'll save that for the summer when I can do my nails outside on the patio!.....ahh summer hmmm :)


I know you like my polish and photo taking skills...."How did she do that?",  Magic ladies....magic.


SHINYYYYY!!

This is the lovely lovely polish that I used today. It might seem more summery, but the color I think, is great for spring, pair it up with light florals for a nice pop of color!


"There it is! She did it again!"...ok ok I give. I used the self-timer hehe.


WAHHHH I made a boo boo. Little sausages aren't so easy to work with after all!

I may have been a hand model in my former life...JUST KIDDING!!

Just look at that color! Guess what, its just ONE coat, yes JUST ONE! Which is really nice when you have to do the hurry up and dry wave to get back to that pile of laundry upstairs! Seriously its JUST ONE COAT OF COLOR!


So let me what you think? I have to say it's a pretty flattering color on anyone. Its pretty delicate on fairer skin but imagine a tan with that baby...oh yeah! Hot Stuff ;)


**By the way I left some of those smudgies to show my handiwork oh yeah...really though it's virtually impossible for me and my southpaw to NOT get polish on my actual FINGER...SO
after its all dry I take a q-tip and dip it into nail polish remover and just clean up all the edges and cuticles that have extra polish :)**


Step-by-Step Attempt of Tyler Florence's Chicken and Dumplings

Hey guys!! WOW, not one but TWO blog posts in ONE day! Thank you Blue Cricket Design for inspiring me and helping me realize that its NOT that hard lol (in a good way :))

So with that said, I can finally share my successful attempt at Tyler Florence's Recipe Tyler's Ultimate Chicken and Dumplings recipe. Boy was it scrumptious! I am so glad I documented the process that went into making this so that I can better share the steps along the way!

ENJOY and I hope that if you do try this, please let me know how it went I would love to hear about your creative twists on this wonderful comfort food!

Gather your ingredients :)

Chicken and Stock:
  • 1 (3 to 31/2 pound) whole organic chicken
  • 2 bay leaves
  • 6 sprigs thyme
  • 4 to 5 black peppercorns
  • 1 head garlic, split through the equator
  • 2 tablespoons salt


I'm ready for my closeup!

Place the chicken and all stock ingredients in a large Dutch oven and cover with water. Set over medium-high heat and bring to a boil. Reduce heat to a simmer and cook for 1 hour until the chicken is tender. Skim the surface of fat and scum (ew) as it cooks.
To prepare the Dumplings:
Buttermilk-Chive Dumplings:
  • 2 cups all-purpose flour
  • 1 tablespoon bakingshowlist_icon.gif powder
  • 1 teaspoon salt
  • 2 eggs
  • 1/4 cup chopped chives
  • 3/4 to 1 cup buttermilk


Sift the dry ingredients together in a large bowl. In a small bowl, using a whisk, lightly beat the eggs, chives and buttermilk together; pour the liquid ingredients into the dry ingredients and gently fold. Mix just until the dough comes together; the batter should be thick and cake-like.


To prepare sauce: In a Dutch oven, over medium heat, add the butter and oil. Add the carrot, celery, garlic, and bay leaves and saute until the vegetables are soft, about 5 minutes. Stir in the flour to make a roux. Continue to stir and cook for 2 minutes to coat the flour and remove the starchy taste. Slowly pour in the chicken stock, 1 cup at a time, stirring well after each addition. Add frozen peas and pearl onions.
Let sauce simmer until it is thick enough to coat the back of a spoon, about 15 minutes. Stir in heavy cream.


Fold the reserved shredded chicken into the sauce and bring up to a simmer. Using 2 spoons, carefully drop heaping tablespoonfuls of the dumpling batter into the hot mixture. The dumplings should cover the top of the sauce, but should not be touching or crowded. Let the dumplings poach for 10 to 15 minutes until they are firm and puffy. Remove and discard the bay leaves. Season with freshly cracked black pepper and garnish with chopped chives before serving.


And there you have it!!!

Here I thought, "Man, Tyler Florence is AWESOME at what he does, it will be impossible for an amateur like me to do it." 
WRONG!!!! If you watch his show he simplifies it nicely!!! When it comes time to actually doing the recipe, as long as everything is mise en place, YOU WILL BE FINE and it will turn out quite good!!

So here HIS recipe, just in case I may have accidentally left anything out above!! I am SO glad I can share this with you guys. As you can see by the timestamp I am a major procrastinator and should have posted this blog eons ago!! Well no fear because now its here!!! :)

ENJOY!!!!!

Show and Tell Green

From Boppy BOOO to BOPPY RAWR baby! :)

My Boppy Cover KNOCKOFF!!!


SO, I realize that I should make much more of a commitment to this blog :( and I don't. SHAME ON ME.....Hopefully today should end that.  Thanks to THIS BLOG I have been encouraged to make a post simply to show and tell :)

So today I have decided to share my beginners skills on a boppy (nursing/baby) pillow cover! :)
Let me just tell you how awesome boppys are!

~It's great from day one, I had mine at the hospital to nurse my itty bitty when she was born!
Wait, thats not me!
NOOO!!


Even as our LO got older, it remained a part of our daily lives!


Unfortunately, so did the slipcover.....

which is in EVERY picture! Its not ugly but it gets old really fast! What can I say, I finally found the time to make a change!

I took inspiration from a blanket that my daughter has which is has a minkee(sp?) brown fabric on one side with a pink shaggy fabric on the other bordered with a fleece leopard print...so cute and luxurious! lol!

The effect of its LUXURY! lol

So I went out for this project and as a beginner I decided to keep it simple! I found this pattern on sale at Joann's.  And I purchased the materials required at Wal-Mart.  Then I finally took the time to complete my project following the directions on the pattern.

Boring ol' Boppy without the cover.
RAWR!
The snazzy velcro enclosure!

This particular pattern calls for the envelop style where the pillow is stuffed and I do mean STUFFED into the slip where one piece overlaps the other.  There is black piping along the edges and it is sealed closed with velcro.

So there you have it. It goes in with her safari theme, but adds a bit more girly flare (IS IT ENOUGH PINK FOR YOU? LOL)

Maybe I will update this soon with her in it, she's a lounger and a big reader (well picture looker at'er anyway) so hopefully I can catch her in it again with the new cover :)

I am also planning to make another one tailored for a good friend's baby boy who has yet to arrive! :)


So what do you guys think? I would love to hear your opinions and constructive criticism and I hope to do (and share) more of these projects! :) Thanks for reading!!!!


Show and Tell Green

And thank you to Blue Cricket Design for allowing me to show and tell today! <3<3<3<3


**Now the only downside was the pillow seemed to be too small for the finished product, so either my pattern cutting abilities are lacking or my boppy is worn in a bit. Next time I think I will trace the pillow into the fabric.  Which also reminds me that I prefer the zipper enclosure of the other cover.  While inserting a zipper may prove to be more difficult, in the long run it will be easier to put on and remove the cover.**